Map, Compass & GPS

Map, Compass & GPS
Wild flowers along Fall Creek on the way to the Green Lakes - Oregon

Thursday, February 27, 2014

Dead Reckoning

You're hiking off trail with out a GPS.  The weather changes and now visibility is reduced.  How do you navigate back to the trail head?
It’s time to return to base camp.  Navigation during this trip has been by map and compass alone; no GPS.  During the three days of the outing, navigation has been straightforward and simple.  Visibility has been excellent and compass triangulation worked well.  Now as the return trip is about to begin, fog has rolled in masking terrain features.  The absence of a reliable trail system will make the return trip challenging too; travel will be overland.
A process called Dead Reckoning (DR) can be used to navigate and partially compensate for the loss of terrain features and important visual cues.  DR is a method to determine one’s estimated present and future position.   Dead Reckoning can be done during periods of darkness, bad weather, in featureless terrain (e.g., the desert, whiteout conditions) or equipment failure (e.g., dead GPS batteries.)
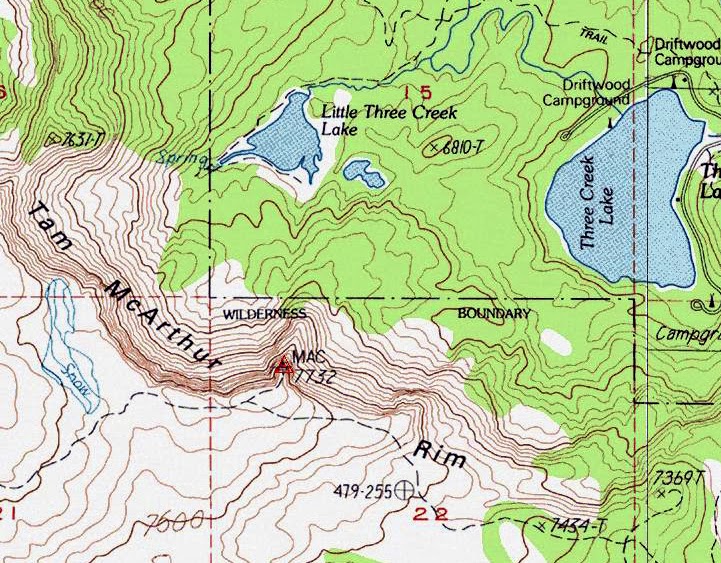
DR is a method of navigation dating back hundreds of years.  It works well on both land and sea.  It is nothing more than moving in a set direction of travel over a specified distance.  By looking at a map, the hiker determines a direction of travel and attainable distance.  As illustrated in Figure 1 below, travel is plotted on a map; frequent verification is important.

To read the rest of the article go here.

Wednesday, February 26, 2014

Bad Elf GPS For Your Smart Phone

The following post/product review is from seattlebackpackersmagazine.com.  Bad Elf is a smart phone GPS accesory.

Using your smartphone as a GPS on the trail is great, but can be frustrating because of the time it takes to lock onto your location in low or no-reception areas (iPhones and Androids mostly rely on cell towers to triangulate). The solution might be a Bad Elf. Bad Elf uses satellites for its GPS products to get your location quickly.  This week I tested two separate Bad-Elf products in the Cascades: the Bad Elf Lightning Connector and the Bad Elf Pro.

To read the rest of the post go here.

Thursday, February 20, 2014

The Swiss Army Knife

Philip Werner at sectionhiker.com just posted a review on the classic Swiss Army knife.  Its a great piece of gear.

You don”t need a big knife for backpacking. I’ve been using the same Victorinox Swiss Army Classic pocket knife for going on 8 years now and I’ve never found the need to replace it with something different or bigger. If you are trying to shave weight from your pack, this little gem only weighs 0.7 oz. and comes with a very serviceable pair of scissors, nail file, a blade. tweezers and a toothpick. Unless you plan on skinning a deer or filleting a fish, this pocket knife is all you need.

To read the rest of his post go here.

Leon at Survivalcommonsense.com has a review on the same knife as well.  Go here.

Locating the North Star


This fine post is from my local news paper The Bend Bulletin.  Written by Ken Fair Field; nice work.

Learn how to find Polaris in night sky
Published Feb 19, 2014 at 12:06AM / Updated Feb 19, 2014 at 06:41AM
In an age of seemingly magical electronic devices, GPS being one, we rely on technology to determine where we are on the planet, enabling us to navigate at sea, along the ground and in the air. Still, it is comforting to know that in the absence of technical aids, it remains possible to tell directions and know by latitude where we are on the planet.
Long ago, travelers used the North Star, Polaris, as a reliable tool to navigate safely over long distances. With a few guideposts in the night sky, you can find the North Star without a telescope or sky chart.
The Big Dipper is located in the lower portion of the constellation Ursa Major. At 8 p.m. tonight, it will be high in the sky over the northern horizon (see illustration). Four stars form its “bowl” with three more making up its attached “handle.”
By naked eye, find the two outside “bowl” stars, Dubhe, the lower star, and Merak, the upper one. Less light-polluted areas make spotting them easier. Draw an extended imaginary line through the outside “bowl” stars, and the line will lead you to the North Star. Polaris is the end “handle” star of the Little Dipper, which is inverted in relation to the Big Dipper. Facing Polaris points you north. South will be directly behind you. West will be at your left hand and east at your right. You have identified the four directions!
Now, extend an imaginary line from yourself to the horizon below Polaris. Still looking at Polaris, draw a straight line angling from Polaris to you. The angle created at the intersection of these two lines (your position) reveals your latitude on Earth, about 44 degrees. To further illustrate, if you were at the North Pole, Polaris would be directly over your head, making an angle of 90 degrees.
Stars appear to move in circles around Polaris at the rate of about 15 degrees every hour to complete a full circle. In reality, of course, this illusion is created because the Earth rotates west to east. Place a camera on the ground and leave its shutter open for a while and the image obtained will show beautifully curved star trails representing portions of complete circles.
— Kent Fairfield is a volunteer with Pine Mountain Observatory and a lifelong amateur astronomer. He can be reached at kent.fairfield@gmail.com. Other PMO volunteers also contributed to this article.

Tuesday, February 18, 2014

GPS Satellite Launch


The U.S. is getting ready to launch it's newest GPS satellite.  Notice that the bird being replaced was launched in 1997.
The United Launch Alliance Delta 4 rocket family will launch a new GPS IIF satellite from Cape Canaveral Thursday night.
Liftoff is scheduled for Thursday at 8:40 p.m. EST, at the start of a 19-minute launch opportunity, according to the United Launch Alliance. The window is timed to deliver the GPS IIF-5 satellite directly into Plane A of the navigation network 11,000 miles above Earth.
GPS IIF-5 will replace the aging spacecraft known as GPS IIA-28 in Plane A, Slot 3 of the constellation. The GPS IIA-28 satellite was launched aboard Delta 249 on November 5, 1997, as the final member of the Block IIA series. It will go into a reserve role in the network for the remainder of its useful life.

For info, this post is from "GPS World," an online magazine.  Visit  this site to read the rest of the article.


Monday, February 17, 2014

Compass Navigation - Moving Through the Backcountry


Before leaving for a backcountry trip, there are three important steps to accomplish before leaving home. First, tell someone where you are going and when to expect your return.  Second, leave a map of your planned route with that responsible person and in your vehicle. Third, fill out the trip plan I have posted on my web site at www.outdoorquest.biz/Links.htm; the trip plan stays with the responsible person.  As a Search and Rescue volunteer I have learned that these key steps can make a huge difference in you having to spend an unplanned night in the woods and being found----especially if you incur an unexpected injury or loss of communication.
The following are suggestions to consider before and during a trip into the backcountry.
While compass accuracy is important, many underestimate the topographic map as a key component in backcountry navigation.  I recommend carrying a set of maps that include a 7.5’ United States Geological Survey (USGS) map and a map like a United States Forest Survey map.  The USGS map gives me the detail information of the immediate area while the other map covers a much broader area.  I look for significant land features that will surround my direction of travel.  Features such as distinct mountain peaks, a stream, and a ridge line are just of few topographic “hand rails” that can help.  For example, if a large stream is to be on your right and it’s not there, it is time to double check your navigation picture (figure 1).
To read the rest of the post, go here.

Your Survival Shelter

There are lots of discussion about what is the best survival shelter.  Here is a video by Peter Kummerfeldt about his recommended shelter system.


Wednesday, February 12, 2014

Land Navigation - Why Backstops Are Important

A backstop keeps the hiker safe.  By using a natural and man made land features, a backstop keep the hiker in the right area.  Backstops are found by a careful study of a topographic map. 

One feature every outdoorsman should pay attention to is called a “backstop.”   A  backstop is a boundary or a natural barrier that keeps one in their specified hiking area.  If a hiker goes beyond the backstop, then they will know they have gone too far.

When looking over a map of a hiking area, it is essential to understand the impact of terrain and land features.  Doing so will allow one to build an association of topography with a general lay of the land.  Key on natural and man-made features that includes roads, streams, buttes and buildings.  Take the time to really examine the map’s topography by studying the brown contour lines. This attention to detail will give the hiker a “feel” for elevation changes, shape and important land marks.  More importantly, it will allow the hiker to develop a mental map of the hiking area.  This concept lends itself to map training for those not backcountry experienced, and it is an excellent  teaching tool for children.


For example, in the image above ForestRd 32 serves as a backstop.  The hiker should remain west of ForestRd 32 because traveling east of 32 is hazardous due to the Swamp. Additionally, note that key terrain features associated with the trail include the river, mountains, a road and the swamp.

The example above is very simplistic but demonstrates the importance of having that “mental map”, especially if visibility becomes an issue.


The image above offers another example.

The map above is an area of steep terrain to the west, a lake to the east and trails surrounding most land features.  If the hiker planned to bushwack west of the campground (just below the larger lake) and hike in fairly flat terrain with gentle elevation changes, then the steep terrain to the west (Tam McArthur Rim) would be an excellent backstop. This is because it provides confirmation of the hiker’s general location. Care should be taken when using  trails that border Little Three Creek lake-note that the trail doesn’t continue west.  In such a situation, it is possible for the hiker to walk beyond the lake.

Backstops are another navigation tool that can keep the hiker in a safe location, and should be utilized as a visual resource.


Tuesday, February 11, 2014

Evaluating Back-Up Magnetic Compasses


Do you carry a back-up compass when you leave the trail head?  How accurate is it?  This post discusses what your options are.

Frequently in my backcountry land navigation class, I am asked about the need to carry a back-up compass.  Generally students are interested in a light weight model that is low in cost, small in size, and would “fill in” as needed. 

I purposefully evaluated several models many consider to be back-up options.  When choosing a back-up magnetic compass, the hiker must ask himself “What are my priorities?  Is it accuracy? Reliability?  Cost?  Size and weight?”
Different models bring different values to the outdoorsman.   If the primary compass got crushed, misplaced, or stopped working what model would serve as a back-up to get out of the woods safely?  Generally a back-up compass isn’t as capable as the primary.  People want to cut back on weight and expense.
For this evaluation, I selected five commonly used compass models.  They are: the Brunton 9020G, a wrist watch compass “The Navigator” (sold by Country Comm), the Silva Type 3, the Silva Type 7, and a ball compass by Outdoor Product (not Outdoor Research.)

I will compare the five selected back-up units to the highly regarded Silva Ranger (CL 515) and Brunton 8010G base plate compasses to establish a bearing standard. The Silva ranger and 8010G models are oriented to magnetic north as shown below:

Figure 1   The Silva Ranger (left) and the Brunton 8010G (right.)

Neither the Silva Ranger nor Brunton 8010G are adjusted for declination for this review.  This provides a consistent baseline for evaluation purposes. 
To begin the comparison of the back-up compass models, I chose to define them in the categories of (1) reliability (2) accuracy and readability (3) cost and (4) size and weight.

Reliability:
I picked up each back-up compass model option and turned it in place rotating the compass and magnetic needle.   I then stopped and set it on a flat surface oriented to magnetic north.  I quickly found that the Brunton 9020G, and the Silva type 3 and 7 settled quickly and matched the bearing of the standards.  The compass needles quickly aligned to magnetic north and required little movement on my part to stabilize the compass.

The ball and wristwatch compasses were extremely finicky.  Both models required time and manipulation (moving the compass housing side to side, up and down) to get them to align to magnetic north.  Both required what I consider to be excessive movement to level the housing to allow the needle or ball to swing freely.  This was especially true of the ball compass; frustrating.
Figure 2 Compasses from left to right: The Brunton 9010G, The Navigator, Outdoor Product ball compass, Silva type 7 and type 3.  Note that the five compasses close proximity to each other cause the magnetic needles pointing in different directions.
Accuracy and readability:

I then checked the compasses for their alignment to magnetic north.  All models were in general agreement but the three baseplate compasses ( Brunton 9020G, Silva Type 3, Silva Type 7) allowed for a more accurate reading with 2° increments marked on the rotating dial.  Further, each baseplate compass could be used for sighting on a distant object to triangulate the hiker’s position.

The ball compass and the watch compass did not provide for accurate measurement; they just aren’t built for that.  The Navigator has increment tick marks every 10° and the ball compass is marked every 15°.  That said, both will provide a trend of direction. Knowingly choosing a trend of direction verses specific bearing accuracy is a critical choice for the outdoorsman when selecting a back-up compass model.  The impact of providing a trend of direction is that these compasses will indicate that the hiker is moving in a generally northerly direction as opposed to hiking along a bearing of 350°.

Cost:
The most affordable are the ball compass ($2.00) and the Navigator (under $5.00).  The three baseplate models range from $10 to $12.

Size and Weight: 

The wrist watch Navigator is the most compact and is read quickly.  Having a compass on the wrist takes a bit getting used to; it’s just different.  The ball compass is most frequently worn on the exterior of a jacket or on a pack’s web gear.  Both are quickly accessible and are feather light.  
The Brunton 9020G is the largest of the group.  That said, all three baseplate compasses fit easily in a shirt pocket.
Size and weight is of minimal concern for all five models.

The ball compass and Navigator are fine for short day hikes.  Both are good choices as an introductory model and get young people interested in navigation early.

For serious backcountry adventures I’d opt for one of the baseplate models.  The 9020G's ability to adjust for declination is a big plus for me.  The baseplate models are the natural progression for learning the finer points of compass navigation.

Monday, February 10, 2014

Base Layer Clothing Selections

Fall is in and people are searching for information about selecting the right baselayer clothing for backcountry travel.  I wrote this post last January and it's getting a lot of hits again.  Time to repost.

Do you know what your options are when purchasing a new base layer for your next winter back country trip?


In late November my local newspaper, the Bend Bulletin (Bend, Oregon) published a supplementary insert called the High Desert Pulse.  On page 28 there was a superb article by Elise Gross titled “Cover Your Bases.”


A base layer is the garment worn closest to the skin.  In the past, most outdoorsmen thought of a base layer as a simple set of “long johns.”  The days of cotton long johns are fading.  Cotton clothing retains moisture and in winter provides no insulation when wet. 


 Ms. Gross provided a fine discussion of the options of the various base layer choices available to the hiker.

She states:

“.. Your activity level and the temperature should be taken into account when choosing a base layer.”

“Fabric type should also be considered.  Base layers are made of a variety of fabrics with unique properties.”

The following is a brief synopsis of what is available.

·         Wool - Merino wool is at the top of my list.  Merino is soft and doesn’t irritate the skin.  Smart Wool is my favorite.  Wool works well in mild to cold temps.  Wool wicks sweat away from the skin.  It dries relatively quickly.  Wool is antibacterial so it doesn’t start to smell over time as silk and poly does.  It’s expensive.

·         Silk – Silk that has been modified to improve wicking is a fine choice (untreated silk absorbs and retains moisture).  Silk works well during periods of heavy physical exertion.  Though it can get too warm, silk works well in cold climates.  Silk takes longer to dry than wool or polyester.  Silk can get stinky so launder after use.


·         Synthetics – These are popular big sellers and big advertisers in outdoor magazines (e.g., Under Amour).  Synthetics are fine in moderate temperatures.  Wet material close to the skin may be chilly until dry.  Moisture wicking is excellent; that’s the big plus.  Synthetics dry faster than any other base layer material.  Synthetics can get stinky so launder after each use.  

All products mentioned are light and take up little space.
Consider carrying an extra top to keep the hiker dry and warm. 

Thursday, February 6, 2014

SPOT 3 Review

Philip Werner has an excellent review of the newest SPOT personal locator beacon.  I have used both SPOT 1 & 2 and have been very satisfied with their operation.

The SPOT Gen 3 is the newest device is the SPOT family of satellite-based personal locator beacons and communication devices designed for outdoor adventurers and represents a significant improvement over the earlier SPOT II in terms of usability and functionality. But the SPOT Gen 3 doesn’t replace the SPOT II, at least not yet, and the company continues to support all of the previous  support plans that it offered for the SPOT II device.

To read the rest of the review go here.