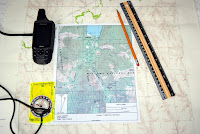
Map, Compass & GPS

Map, Compass & GPS
Wild flowers along Fall Creek on the way to the Green Lakes - Oregon

Tuesday, November 29, 2016

The Declination Diagram


Topographic map users are familiar with the small diagram at the bottom of the map. 
The diagram is located at the bottom center of the map.

Let’s zoom in to the diagram itself.

The graphic and information presented relates directly to the declination of the map area, orientation of magnetic north, orientation of grid north and true north. 
Let’s discuss what that all means.
The line on the left with the star on top is the reference to true north.  True north is the principle geographic reference on all maps.  True north is oriented to the North Pole, the top of the earth.  The left and right borders of a topographic map are aligned to true north too.  True north is the principle compass orientation that the backcountry traveler will use with compass navigation.
Care should be taken when looking at the other grid lines on a map.  For example, not all township and range lines are oriented to true north.  The red lines on the map below

represent township and range.  The red numbers refer to each of the 36 sections found in a township. (A section is a square that is one mile by one mile on each side.)  Determine if these red line are oriented to true north in advance of your trip.
The next line over is “grid.”  Grid in this case refers to Universal Transverse Mercator Grid (UTM).  UTM is a derivative of the military’s grid reference system and came about after World War Two.
Some maps come with UTM grid lines laid out in a shade of light blue.  Many topographic maps only have UTM tick marks (color blue) along the four sides of the map.  The map above has those tick marks.  Small they can be seen as numbers 6 21 and 22 at the bottom.  If one was to use a straight edge to connect the 6 21 at top and bottom the line drawn would be in relation to grid on the declination diagram.  (For more information on UTM Grid check out Lawrence Letham’s book GPS Made Easy from library.)
The last line refers to magnetic north.  This data is circled in red (below.)
The line with the partial arrow head points to magnetic north (MN.)   Without getting bogged down in the pole’s location, the key thing is to understand is that magnetic north is what a compass’ red magnetic needle point to. The numerical value of 19° refers to the declination; the angular measurement between true and magnetic north.  In this case, the declination is 19° East.  It is this value that the hiker will compensate for in navigation. 
To keep things simple, I use a declination adjusted compass so that I do not have to calculate compass values.  For example, if the hiker is using a standard compass, 19° East declination (from the West Coast) would be subtracted from a bearing/azimuth of 100° True to get the correct magnetic heading.  This gets a bit sticky and that is why an adjustable compass is so valuable.  With an adjustable compass, you adjust the compass housing once for the local declination.  Once adjusted you are set and won’t need to worry about adding or subtracting the declination value.
The declination value on older maps has probably changed from what is printed.  Declination changes over time.  As a matter of routine I visit www.magnetic-declination.com to get the correct value before leaving home.


The north star

Sunday, November 20, 2016

New Backpacker's Gas Stove

It has been a while since Hikin'Jim evaluated a new stove.  


"OK, so, what's all this about the Soto Amicus? I mean why all the fuss? There are dozens of upright canister gas stoves available out there. Primus, MSR, Optimus, Snow Peak, Jetboil, etc. – in short, all the major stove companies – have upright canister stoves out on the market, in fact, most of those companies have multiple stoves available. So who cares about just one more upright canister gas stove? Big deal. Yawn. Well, maybe. But maybe not. Maybe there's more to it than that. Let's keep reading, and we shall see. The New Soto Amicus OK, so why am I excited? Well, I'll...." 
Hikin' Jim's blog - Adventures in Stoving is one to book mark .

Thursday, November 17, 2016

Your Personal Outdoor Plan

There are lots of articles and posts discussing the importance of  letting a responsible person know about your travel plans .  Should you not return home on time they are the trigger to begin the search process.


Further, building your personal outdoor plan is important too.


Outdoor Quest/Blake Miller image
After the loss of James Kim in the Oregon back country in 2006 I wrote a hiker's trip plan and posted it on my web site.  I had input from several valued sources.  I wanted something better for the wilderness traveler than a note to a neighbor.  My intent was to provide the search responders something valuable to go by.


In far too many SAR missions, the reporting party has little information for the searchers to go on to begin their search.

My plan can be found here.  It is a basic .pdf form.

Suggestions are certainly welcome.


Recently while reading a Linkedin email, I received a tip on what might be the most complete plan yet.  It's from Paul Kirtley's blog.  He is an  experienced bush craft author in the UK.  This plan is much like the hiker's flight plan.  It includes a place for a picture of the hiker, data for one's route and much more.


Check out Paul Kirtley's plan here.


911 Call center
Still, that responsible person plays a huge role in contacting authorities to begin a search.  My recommendation would be to pick a person that will make the 911 phone call without hesitation.

Travel safely.

Monday, November 14, 2016

Facebook

Join me on Facebook.  I've have a group that supports this blog.Your thoughts and comments are always welcome.


Sunday, November 13, 2016

Navigating a Topographic Map


Reviewing a topographic map is usually the starting point for the planning of any back country trip.  A topographic map is your road map to the outdoors.  It provides you detailed information at a scale that is meaningful and detailed.  For years, the US Geologic Survey (USGS) has been the principal publisher of accurate maps.  Within the last decade we have seen many innovations in mapping products that include new mapping companies and publishers, software, maps for the GPS, and “Apps” for the iPhone.
Outdoor Quest/Blake Miller image

Still, the USGS map remains the standard for back country navigation (visit the USGS’s site at www.topomaps.usgs.gov.)   I’d also recommend looking at June Fleming’s “Staying Found” or Bjorn Kjellstrom’s “Be Expert With Map & Compass.”  Once you develop a map foundation you will easily shift to many of the other products on the market today. 

Many publications, videos, and web sites will give you a te rundown on the features, symbols and components to a map.  This article will discuss a few of the key features that you should be aware on a 7.5 minute map.

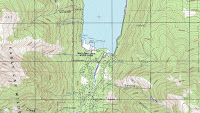
·         Contour Lines These are the thin brown lines that snake across the map.  Contour lines connect equal points of elevation such that every point on that line will be at that elevation above sea level.  Visually, the contour lines give you a mental three dimensional view of the terrain.  These lines provide a view of slope and pitch, depressions, ridge lines and level ground; the highs and lows of the earth’s surface.
Outdoor Quest/Blake Miller image
 These lines provide shape and a sense of texture. There are two primary types of lines, index and intermediate lines.  Index lines stand out as they are a touch wider, a darker shade of brown and indicate the elevation with numbers such as 4500; the elevation is in feet.  Between the index lines are the thin intermediate line that are spaced uniformly and further define the elevation, slope and contour.  The intervals between the intermediate lines are specified at the bottom of the map adjacent to the scale data.

·     Scale Consider scale as your view of the map; it is like your “overhead zoom” setting.  To cut to the chase, a 7.5 minute map or quadrangle has a scale that is referred to as 1:24,000; where one inch is equal to 2000 feet.  It is your best source of information of the back country.  At this scale, the map has much more validity and provides more usable information for your backcountry planning.  You can view important landmarks, streams and geographic features.  To complete the navigation picture I always refer a second map, such as a map of the national forest (e.g., the Deschutes National Forest.)  Commonly, such a map will be “zoomed” way out and have a scale of 1:100,000 or 1:250,000.  Imagine that such a map would be made up of many 7.5 minute quadrangles.

·    North  Features on a map such as trails, roads, mountain peaks and streams are all laid out in relation to true North; the North Pole.  The north-south borders of the map and the small declination diagram are your best references for true North.  Other grid lines (such as the red Township, Section and Range lines) may not be aligned to true north at all.  Be careful of these lines should you need to triangulate your position on a map.

·    Declination This is the angular difference between true North and Magnetic North.  The red needle on your magnetic compass points to Magnetic North.  The accuracy of the information found in the Declination Diagram is dependent on the age of the map.  To get the latest declination for any area visit www.magnetic-declination.com.

Personally I use a magnetic compass that I can adjust for declination; it just makes my navigation easier.  When adjusted, my compass provides bearing information in degrees true as does my map and my adjusted GPS.

·    Coordinates Latitude and Longitude (Lat/Long) are the familiar coordinate system to most outdoorsmen and women.  Coordinate data is found at the top and bottom corners of each map.  Lat/Long coordinate increments are also found every 2’ (minutes) and 30” (seconds) on the sides of the Map.  A scaling device is necessary to pull complete coordinates off a map; this is a pain.

In the 1940’s a coordinate system know as Universal Transverse Mercator (UTM) was developed.  To keep a very long story short, your 7.5 minute map has a new grid laid over it, the grid dimensions are 1000 meters by 1000 meters.  For more complete information on UTM grid visit the USGS’s web site UTM or Lathem’s “GPS Made Easy” (which is probably at your local library.)

Simplicity is the essence of UTM.  Scouts, hunters and hikers have joined Search and Rescue (SAR) teams around the country in using this system. 

Your GPS receiver can easily be switched to UTM from the set-up menu.

·    Bar Scales   Notice the bar scales at the bottom of the 7.5 minute map.  The scales provide measuring data in miles, feet and meters.   On the far left side of the meter scale, the scale is broken down into units of 100 meters, this applies directly to UTM.

Notice on the scale bar (feet) that 1 inch equals 2000 feet.

·    Map Datum Information about map datum is found in the lower left corner of a 7.5 minute map.  I have found that the simplest definition from GPS maker Garmin is:

“A math model which depicts a part of the surface of the earth. Latitude and longitude lines on a paper map are referenced to a specific map datum. The map datum selected on a GPS receiver needs to match the datum listed on the corresponding paper map in order for position readings to match.”

The bottom line: most 7.5 minute maps are made to the North American datum of 1927 (NAD27 or NAD27 CONUS on your GPS).  New GPS receivers are set to datum WGS84.  The difference between the datum could be over 100 meters/yards.  The solution: When pulling points off a map shift your GPS’s datum to match the map. 

If precision is not an issue for your outing don’t worry about datum.

As you begin your trip planning don’t forget the magnetic compass, the important partner to any topographic map.  See Selecting a magnetic Compass for more information about buying a good compass.


Friday, November 11, 2016

Ten Essentials and the Norwegian Mountain Code

While researching the ten essentials a few years ago I came across a post about the Norwegian Mountain Code.

1967, Norway tragically lost 18 backcountry hikers during an Easter weekend storm.  Later the Norwegian Red Cross and Norwegian Mountain Touring coordinated the development of the code; a common sense approach to back country winter travel.

The code compliments the Ten Essentials and builds on it.

The Norwegian Mountain Code captures the elements of travel that includes:


#1
Plan your trip and inform others
about the route you have selected.
#2
Adapt the planned routes
according to ability and conditions.
#3Pay attention to the weather

#4
Be prepared for bad weather

#5
Choose safe routes


#6
Bring necessary equipment


#7
Use a map and a compass.
Always know where you are.


#8

Don't be afraid to turn around
#9
Conserve your energy and  seek shelter if necessary.
Each item (above) is covered in more detail on the web site.


Tuesday, November 8, 2016

Defining Compass Bearing and Heading


Bearing and heading are two commonly used terms and two of the most misunderstood.  This post will define and review both terms. 

A dictionary defines the word bearing as:

“….horizontal direction of one point with respect to another or to the compass.”

Simply stated a bearing is the angular direction to an object.  Bearings are described in degree increments from either true or magnetic north.

A compass bearing and heading is measured from north clockwise in 360° increments. The point from which the bearing originates is from the center of an imaginary circle.  This imaginary point is the operator.


The direction to an object (a tree, mountain top, or lake) could simply be east or 045° (read and stated as zero four five degrees.)
Outdoor Quest/Blake Miller image


Outdoor Quest/Blake Miller image


GPS receivers display an incredible amount of data that is important to the hiker.  The GPS compass page, above, predominantly displays bearing information to the hiker. 

In land navigation heading refers to the hiker’s direction of travel.  Heading is a compass direction just as a bearing is.

In the example below a hiker is travelling from point A to point B.  The hiker’s course is the planned direction of travel; about 060° degrees.  Because of obstacles along the way the hiker must change the direction of travel and adjust the heading to arrive at point B.

.Outdoor Quest/Blake Miller image


Because the hiker must change the heading the dashed blue line better describes the actual path through the backcountry.  The hiker’s path may be made up of several headings. In the example above the heading from C1 to C2 could be 100°, about forty degrees different than the planned course.


Friday, November 4, 2016

Leave No Trace

The following is by contributing writer Lee.  Here he expands on the principles of leave no trace.
Leave No Trace: How to Enjoy Backpacking Without Damaging Nature

One of the most enjoyable ways to spend time is to go backpacking. Getting out of the concrete city and back into the embrace of nature is one of the best ways to recharge your batteries and satisfy your soul. You have to be careful when you go hiking not to let the dirtiness of the city enter into the pristine wilderness. The only ethical way to hike is to leave no trace behind. You have to embrace this philosophy totally. Here is a guide on how you can enjoy backpacking without damaging nature.
Travel the Proper Paths
Although they say you should leave nothing but footprints when you go into the wilderness, even your footprints can be damaging if you are hiking in sensitive areas. You can hurt wildlife and plants alike when you go tromping through areas where you don’t belong. You can also contribute to damaging erosion if you hike off-trail.
To prevent this, you should always stay on the marked trails whenever you go hiking. Don’t cut across switchbacks or look for shortcuts that leave the marked trails in a wilderness area. If you are hiking in the backcountry, try to blaze trails that go through open areas where you will do as little damage as possible. Always keep your eyes open to avoid stepping on wildlife or sensitive plants. If you are hiking the backcountry in a group, do not travel single-file so that you keep the damage you cause to a minimum.
Campsites Are Best Found
Whenever possible, you should always try to camp at an established campsite. Camping at a brand-new campsite will always damage nature at least a little bit. If you are camping in the backcountry away from campgrounds, you should camp at least 200 feet away from water sources to avoid disturbing wildlife. Try to select a flat, level area that has as little vegetation as possible to keep your impact on the site to a minimum.
 Leave Nothing Behind
The most important thing you must do when you go hiking is to leave no garbage behind of any kind. This includes every kind of waste. If nature calls when you are in the middle of it, then you need to have a trowel with you so that you can bury your waste. You need to pack out every scrap of waste that you create when you are hiking in the wilderness. The most conscientious hikers will actively look for garbage while they are on the trail, picking up anything they spot so that they can leave the area more beautiful than they found it.
Use Fire Responsibly
Gathering around the campfire to sing songs and cook s’mores is one of the most enjoyable ways to finish up a day of hiking, but you need to enjoy your campfires responsibly. Always follow the rules of the area you are in. Sometimes, campfires will be banned because of dry conditions or hot weather. You need to respect these bans.

Always use caution when you are making fires out in the wild. Use established fire pits if they are available. If they are not, keep your campfire small to reduce its impact. Burn all your wood down to ash, and then completely douse the fire with water before you leave the area. Make sure the ashes are cool to the touch before you go.
Don’t Smoke
Cigarettes and hiking don’t mix. The smoke won’t do your lungs any favor on the trail, and you don’t want to haul around dirty old cigarette butts your entire hike. Instead, you should use e-liquid vaporizers when you are hiking. This will satisfy your cravings without damaging the environment.
Hiking is a lot of fun. You must respect nature so that generations from now your ancestors will still be able to enjoy the beauty of our world. Following these guidelines will allow you to keep your impact to a minimum when you are hiking through the great outdoors.

Lee Flynn is a freelance writer. Through small local workshops and articles, Lee trains and teaches others on home preparation, healthy living, food storage techniques, and self reliance


Thursday, November 3, 2016

How Accurate is a GPS Receiver's Calculations.

I have often wondered about the accuracy of my Global Positioning System (GPS) receiver. 
Outdoor Quest/Blake Miller image
The accuracy inherent in my receiver has generally been "good enough for me." That said, I was interested in finding technical information to build on my field experience.
I did a bit of google surfing and found a fine article from Outside Magazine writer Erin Beresini titled Your GPS Is Lying to You About Distance,  Outside Magazine, Dec. 7, 2015.  She distills a complex scientific paper by researchers into understandable terms.

The bottom line for backcountry hiker is that GPS receivers overestimate distance.  There are three reasons for this:

  1. "The first is positioning error, or the fact that there’s a difference between where you actually are and where your GPS thinks you are at any given point in time.
  2. The second error is the variance of the GPS measurement. Even if you don’t move, the samples your GPS takes won’t each be in the same location. In other words, your samples will form a cloudlike cluster of points around your actual location. The smaller that cluster and the closer it is to your actual location..,
  3.  The third is the autocorrelation of GPS measurements. If each measurement is off from your actual location by approximately the same amount, they’re said to be highly autocorrelated, "  Outside Magazine, Dec. 7, 2015. 

There are many other factors that impact the accuracy of a GPS receiver.  These include atmospherics, solar flares, heavy treed canopy, terrain masking and freeway overpasses.   ]In discussions with serious back country hikers ( Search and Rescue members) heavy weather can impact accuracy.

To improve GPS receiver accuracy consider enabling the Wide Area Augmentation System (WAAS).  Newer units can also take advantage of the Russian satellite system known as GLONASS. It is similar to our GPS system. Enabling WAAS and GLONASS combined offers a significant increase in available satellites for navigation process and give the receiver the time needed to establish solid positioning information.


Hard numbers are only vague estimates.  For example, a basic recreation receiver should be accurate to +/- 15 meters.  With WAAS enabled accuracy could become as good as +/- 3 meters.

A GPS receiver is great to have but don't leave the map and compass at home.


Outdoor/Blake Miller image

GPS Accuracy

More On GPS Accuracy