Avalanche is of real concern for those who travel in the back country during the winter.
A good resource is the Pacific Northwest Avalanche Center.
Here is a link to their Web page: Avalanche
Map, Compass & GPS

Wild flowers along Fall Creek on the way to the Green Lakes - Oregon
Friday, December 28, 2018
Rattle Snake Bites
Take a look at the OUTDOOR magazine article by Kyle Dickman about snake bites.
https://www.outsideonline.com/2315436/surviving-rattlesnake-biteSnake Bite
https://www.outsideonline.com/2315436/surviving-rattlesnake-biteSnake Bite
Thursday, November 15, 2018
Backstops for The Hiker and Hunter
A backstop keeps the hiker safe. By using a natural and man made land features, a backstop keep the hiker in the right area. Backstops are found by a careful study of a topographic map.

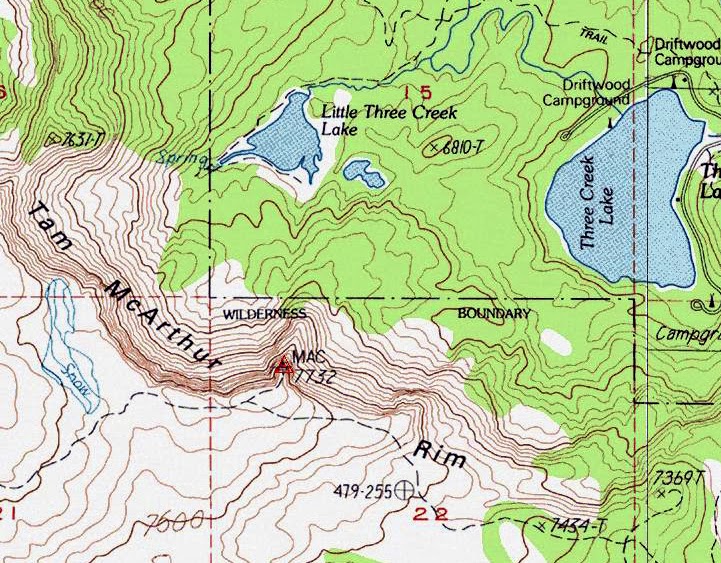
The map above is an area of steep terrain to the west, a lake to the east and trails surrounding most land features. If the hiker planned to bushwack west of the campground (just below the larger lake) and hike in fairly flat terrain with gentle elevation changes, then the steep terrain to the west (Tam McArthur Rim) would be an excellent backstop. This is because it provides confirmation of the hiker’s general location. Care should be taken when using trails that border Little Three Creek lake-note that the trail doesn’t continue west. In such a situation, it is possible for the hiker to walk beyond the lake.
One feature every outdoorsman should pay attention to is called a “backstop.” A backstop is a boundary or a natural barrier that keeps one in their specified hiking area. If a hiker goes beyond the backstop, then they will know they have gone too far.
When looking over a map of a hiking area, it is essential to understand the impact of terrain and land features. Doing so will allow one to build an association of topography with a general lay of the land. Key on natural and man-made features that includes roads, streams, buttes and buildings. Take the time to really examine the map’s topography by studying the brown contour lines. This attention to detail will give the hiker a “feel” for elevation changes, shape and important land marks. More importantly, it will allow the hiker to develop a mental map of the hiking area. This concept lends itself to map training for those not backcountry experienced, and it is an excellent teaching tool for children.
For example, in the image above ForestRd 32 serves as a backstop. The hiker should remain west of ForestRd 32 because traveling east of 32 is hazardous due to the Swamp. Additionally, note that key terrain features associated with the trail include the river, mountains, a road and the swamp.
The example above is very simplistic but demonstrates the importance of having that “mental map”, especially if visibility becomes an issue.
The image above offers another example.
The map above is an area of steep terrain to the west, a lake to the east and trails surrounding most land features. If the hiker planned to bushwack west of the campground (just below the larger lake) and hike in fairly flat terrain with gentle elevation changes, then the steep terrain to the west (Tam McArthur Rim) would be an excellent backstop. This is because it provides confirmation of the hiker’s general location. Care should be taken when using trails that border Little Three Creek lake-note that the trail doesn’t continue west. In such a situation, it is possible for the hiker to walk beyond the lake.
Backstops are another navigation tool that can keep the hiker in a safe location, and should be utilized as a visual resource.
Monday, November 12, 2018
Backcountry Travel Plan

In far too many SAR missions, the reporting party has little information for the searchers to go on to begin their search.
My plan can be found here. It is a basic .pdf form.
Suggestions are certainly welcome.
 |
| 911 Call center |
Travel safely.
Tuesday, November 6, 2018
The Essentials For Your Day Pack
Always Carry The Right Gear
On a warm afternoon in July, a family leaves a trail head
with the goal of summiting the South Sister Mountain
in Central Oregon . It was a rough hike as they took a path not
frequently traveled. By evening it
became obvious that this group would not make it to the summit and the glacier
they were attempting to cross was icing up; it just wasn’t safe to press
on. 911 was called and a local SAR team
reached them after midnight. The
temperature on the glacier dropped below 40° (F) and the hikers were getting cold.
When the SAR team reached them, they found that the group
had some food and water but no other gear.
The hikers’ clothing selection was questionable too.
So what is the right stuff to carry in the outdoors? What is the minimum? What should you consider before hitting the
trail?
A climbing group in the 1930s, The Mountaineers from Seattle
“The Ten Essentials” has been modified by different groups
over the years. The following is the
list that REI recommends:
- Navigation
- Sun protection
- Insulation (extra clothing)
- Illumination
- First-aid supplies
- Fire
- Repair kit and tools
- Nutrition (extra food)
- Hydration (extra water)
- Emergency shelter
- A space blanket is fine to carry but it is a poor shelter.
This is the minimum that one should carry; it is a starting
point. The key is to always carry your
kit with you. I have a day hiking kit
that fits into a fanny pack. It is only
limited by its poor ability to carry extra clothing.
Thursday, November 1, 2018
Accurate Compass Readings
I found these recommendations a while back when I was researching techniques for using a magnetic compass. A small error when using a compass can result in significant error in measurement on the ground.


To obtain accurate readings when using a compass:
- Ensure the compass has been adjusted for declination.
- Hold the compass level and steady so the needle swings freely.
- Hold the compass about waist high in front of the body, except when using a compass with a sighting mirror or a sighting type compass.
- Raise and lower eyes when taking a bearing, do not move your head. Always use the same eye when taking bearings.
- Directly face the object that is being measured.
- Magnetic fields will give incorrect compass readings. Avoid taking readings near magnetic fields such as steel, iron (ferrous metals), vehicles, rebar, and clipboards. Even belt buckles, glasses, and rings can interfere with the compass reading.
- Take bearings twice.
- Adjust for magnetic declination as appropriate.
- Follow the direction of travel arrow, not the compass needle, when walking a bearing. Always follow the line indicated by the compass rather than relying on judgment as to the direction.
- Use back bearings to ensure you are on track when navigating.

- Compare compass reading with those of your GPS.
- Remember that a GPS receiver's compass must be calibrated after every battery change.

Wednesday, October 31, 2018
More About Using a Topographic Map
Reviewing a topographic map is usually the starting point for the planning of any back country trip. A topographic map is your road map to the outdoors. It provides you detailed information at a scale that is meaningful and detailed. For years, the US Geologic Survey (USGS) has been the principal publisher of accurate maps. Within the last decade we have seen many innovations in mapping products that include new mapping companies and publishers, software, maps for the GPS, and “Apps” for the iPhone.
Still, the USGS map remains the standard for back country navigation (visit the USGS’s site at www.topomaps.usgs.gov.) I’d also recommend looking at June Fleming’s “Staying Found” or Bjorn Kjellstrom’s “Be Expert With Map & Compass.” Once you develop a map foundation you will easily shift to many of the other products on the market today.
Many publications, videos, and web sites will give you a te rundown on the features, symbols and components to a map. This article will discuss a few of the key features that you should be aware on a 7.5 minute map.
· Contour Lines These are the thin brown lines that snake across the map. Contour lines connect equal points of elevation such that every point on that line will be at that elevation above sea level. Visually, the contour lines give you a mental three dimensional view of the terrain. These lines provide a view of slope and pitch, depressions, ridge lines and level ground; the highs and lows of the earth’s surface.
· Scale Consider scale as your view of the map; it is like your “overhead zoom” setting. To cut to the chase, a 7.5 minute map or quadrangle has a scale that is referred to as 1:24,000; where one inch is equal to 2000 feet. It is your best source of information of the back country. At this scale, the map has much more validity and provides more usable information for your backcountry planning. You can view important landmarks, streams and geographic features. To complete the navigation picture I always refer a second map, such as a map of the national forest (e.g., the Deschutes National Forest.) Commonly, such a map will be “zoomed” way out and have a scale of 1:100,000 or 1:250,000. Imagine that such a map would be made up of many 7.5 minute quadrangles.
· North Features on a map such as trails, roads, mountain peaks and streams are all laid out in relation to true North; the North Pole. The north-south borders of the map and the small declination diagram are your best references for true North. Other grid lines (such as the red Township, Section and Range lines) may not be aligned to true north at all. Be careful of these lines should you need to triangulate your position on a map.
· Declination This is the angular difference between true North and Magnetic North. The red needle on your magnetic compass points to Magnetic North. The accuracy of the information found in the Declination Diagram is dependent on the age of the map. To get the latest declination for any area visit www.magnetic-declination.com.
Personally I use a magnetic compass that I can adjust for declination; it just makes my navigation easier. When adjusted, my compass provides bearing information in degrees true as does my map and my adjusted GPS.
· Coordinates Latitude and Longitude (Lat/Long) are the familiar coordinate system to most outdoorsmen and women. Coordinate data is found at the top and bottom corners of each map. Lat/Long coordinate increments are also found every 2’ (minutes) and 30” (seconds) on the sides of the Map. A scaling device is necessary to pull complete coordinates off a map; this is a pain.
In the 1940’s a coordinate system know as Universal Transverse Mercator (UTM) was developed. To keep a very long story short, your 7.5 minute map has a new grid laid over it, the grid dimensions are 1000 meters by 1000 meters. For more complete information on UTM grid visit the USGS’s web site UTM or Lathem’s “GPS Made Easy” (which is probably at your local library.)
Simplicity is the essence of UTM. Scouts, hunters and hikers have joined Search and Rescue (SAR) teams around the country in using this system.
Your GPS receiver can easily be switched to UTM from the set-up menu.
· Bar Scales Notice the bar scales at the bottom of the 7.5 minute map. The scales provide measuring data in miles, feet and meters. On the far left side of the meter scale, the scale is broken down into units of 100 meters, this applies directly to UTM.
Notice on the scale bar (feet) that 1 inch equals 2000 feet.
· Map Datum Information about map datum is found in the lower left corner of a 7.5 minute map. I have found that the simplest definition from GPS maker Garmin is:
“A math model which depicts a part of the surface of the earth. Latitude and longitude lines on a paper map are referenced to a specific map datum. The map datum selected on a GPS receiver needs to match the datum listed on the corresponding paper map in order for position readings to match.”
The bottom line: most 7.5 minute maps are made to the North American datum of 1927 (NAD27 or NAD27 CONUS on your GPS). New GPS receivers are set to datum WGS84. The difference between the datum could be over 100 meters/yards. The solution: When pulling points off a map shift your GPS’s datum to match the map.
If precision is not an issue for your outing don’t worry about datum.
As you begin your trip planning don’t forget the magnetic compass, the important partner to any topographic map. See Selecting a magnetic Compass for more information about buying a good compass.
Visit www.caltopo.com for free topographic maps of the Continental US. This is a super mapping program that you can use to explore your area and print them at home. | |||||


Sunday, October 28, 2018
Free GPS Maps
There are several sources of Maps for your GPS receiver.
In the free category I like and use maps from www.GPSFileDepot.com.
ONYXmaps.com maps are not free but the quality is just superb. GARMIN has fine maps too but you will have to pay for them.
Do let me know if you have a free map source that are really good.
In the free category I like and use maps from www.GPSFileDepot.com.
ONYXmaps.com maps are not free but the quality is just superb. GARMIN has fine maps too but you will have to pay for them.
Do let me know if you have a free map source that are really good.
Thursday, October 25, 2018
Topo Map Bassics
Reviewing a topographic map is usually the starting point for the planning of any back country trip. A topographic map is your road map to the outdoors. It provides you information at a scale that is meaningful and detailed.
For years, the US Geologic Survey (USGS) has been the principal publisher of accurate maps. Within the last decade we have seen many innovations in mapping products that include new mapping companies and publishers, software, maps for the GPS, and “Apps” for the smart phone.
Still, the USGS map remains the standard for back country navigation (visit the USGS’s site at www.topomaps.usgs.gov.) I’d also recommend looking at June Fleming’s “Staying Found” or Bjorn Kjellstrom’s “Be Expert With Map & Compass.” Once you develop a map foundation you will easily shift to many of the other products on the market today.
Many publications, videos, and web sites will give you a complete rundown on the features, symbols and components to a map. The key features that you should be aware of are:
· Contour Lines These are the thin brown lines that snake across the map. Contour

· Scale Consider scale as your view of the map; it is like your “overhead zoom” setting. To cut to the chase, a 7.5 minute map or quadrangle has a scale that is referred to as 1:24,000; where one inch is equal to 2000 feet. It is your best source of information of the back country. At this scale, the map has much more validity and provides more usable information for your backcountry planning. You can view important landmarks, streams and geographic features. To complete the navigation picture I always refer a second map, such as a map of the national forest (e.g., the Deschutes National Forest
· North Features on a map such as trails, roads, mountain peaks and streams are all laid out in relation to true North; the North Pole. The north-south borders of the map and the small declination diagram are your best references for true North. Other grid lines (such as the red Township, Section and Range lines) may not be aligned to true north at all. Be careful of these lines should you need to triangulate your position on a map.
· Declination This is the angular difference between true North and Magnetic North. The red needle on your magnetic compass points to Magnetic North. The accuracy of the information found in the Declination Diagram is dependent on the age of the map. To get the latest declination for any area visit www.magnetic-declination.com.
Personally I use a magnetic compass that I can adjust for declination; it just makes my navigation easier. When adjusted, my compass provides bearing information in degrees true as does my map and my adjusted GPS.
· Coordinates Latitude and Longitude (Lat/Long) are the familiar coordinate system to most outdoorsmen and women. Coordinate data is found at the top and bottom corners of each map. Lat/Long coordinate increments are also found every 2’ (minutes) and 30” (seconds) on the sides of the Map. A scaling device is necessary to pull complete coordinates off a map; this is a pain.
In the 1940’s a coordinate system known as Universal Transverse Mercator (UTM) was developed. To keep a very long story short, your 7.5 minute map has a new grid laid over it, the grid dimensions are 1000 meters by 1000 meters. For more complete information on UTM grid visit the USGS’s web site UTM or Letham’s “GPS Made Easy” (which is probably at your local library.)
Simplicity is the essence of UTM. Scouts, hunters and hikers have joined Search and Rescue (SAR) teams around the country in using this system.
Your GPS receiver can easily be switched to UTM from the set-up menu.
· Bar Scales Notice the bar scales at the bottom of the 7.5 minute map. The scales provide measuring data in miles, feet and meters. On the far left side of the meter scale, the scale is broken down into units of 100 meters, this applies directly to UTM.
Notice on the scale bar (feet) that 1 inch equals 2000 feet.
Map Datum Information about map datum is found in the lower left corner of a 7.5 minute map. I have found that the simplest definition from GPS maker Garmin is:
Map Datum Information about map datum is found in the lower left corner of a 7.5 minute map. I have found that the simplest definition from GPS maker Garmin is:
“A math model which depicts a part of the surface of the earth. Latitude and longitude lines on a paper map are referenced to a specific map datum. The map datum selected on a GPS receiver needs to match the datum listed on the corresponding paper map in order for position readings to match.”
The bottom line: most 7.5 minute maps are made to the North American datum of 1927 (NAD27 or NAD27 CONUS on your GPS). New GPS receivers are set to datum WGS84. The difference between the datum could be over 100 meters/yards. The solution: When pulling points off a map shift your GPS’s datum to match the map.
If precision is not an issue for your outing don’t worry about datum.
Visit www.worldofteaching.com/powerpoints/geography/Mapping.ppt. This power point presentation offers a fine overview of topographic mapping. It’s free.
Monday, September 24, 2018
GPS Tune-up for your fall hunt.
Hunters, this is a great time to tune-up and practice with a GPS receiver. There are several things that one can do before leaving home. Here are a few recommendations to consider.
Setup
- Dump those old AA batteries, put in new ones. If you leave your GPS on all day in the
field expect to change the batteries nightly. Consider using lithium AA’s, they last longer and work better in cold temperatures.
Garmin Image
- “Match the map” with the receiver’s navigation selection options. Specifically, match the coordinate system (e.g., UTM or Latitude/Longitude) and map datum that are found on the map. Consider shifting the receiver’s compass to degrees true. Further, let’s have everyone in a hiking or hunting group use the same settings too; let’s all be on the same page.
- Keep you navigation simple. It’s easier to work with a handful of waypoints rather than list of 300. Dump the Junk - Delete the old waypoints, the ones you will never use again. Log important waypoints (e.g., that lake side camp site) on your PC or in a notebook. Visit www.easygps.com or www.garmin.com for a place to store waypoints.
- Install maps on your GPS receiver. Maps on the receiver are a natural complement to your paper field map. Quality maps are available from onxmaps.com and GPSFiledepot.com (free).
- Adjust your map pages’ zoom setting to see what works best. For general trail hiking I keep my zoom setting at 800 feet. This setting allows me to view trails, water sources, roads and elevation contours.
- Visit the manufacture’s web site to see if there are any firmware updates. I do this every couple of months.
- When batteries are replaced calibrate the electronic compass.
Tune-up
- Verify that you are receiving enough satellite signals. Check this on the satellite status screen. Four satellites are the minimum. Give older receivers the time to collect satellite data; don’t rush the navigation process.
- Give key waypoints names. When marking a waypoint enter names like “camp” and “truck.” It’s easier and more meaningful to find “truck” in the list of waypoints than is waypoint 542; or was it 245.
· After marking a waypoint, verify that it has been saved to the receiver's memory by checking either the map page or in the waypoint file (select “where to” or “find.”) If the waypoint is on the map or in the list of waypoints, the hiker is ready to go. If the waypoint is not found, start over.
·
When it’s time to return to a destination chose “Where To” or “Find” on your keypad or menu. Select the waypoint from the list provided. Press the “Page” button and rotate through the many displays to the “Compass” page. A large red arrow should appear on the face of the compass pointing to the selected waypoint. When on course to the destination the arrow points to the top center of the receiver. Practice this specific process at home before heading to the field.
 |
| Outdoor Quest Image |
- Navigation is a perishable skill. I recommend that two weeks before an outing take the GPS receiver everywhere. Add waypoints, delete waypoints and find a saved waypoint. This process develops familiarization with the unit and allows the user to develop confidence with the receiver and personal ability.
- Compliment GPS skills with a good review of map and compass fundamentals. Learn to back up electronic position fixing with bearing triangulation. Worst case, a broken GPS becomes a paperweight for your map while afield. For more information visit www.outdoorquest.blogspot.com .
· When on the trail compare GPS position data with a map. Compare what is presented electronically with what is on the map.
I suggest checking out Lawrence Letham’s book GPS Made Easy from the library. This book compliments the owner’s manual. An excellent reference for map and compass use is June Fleming’s Staying Found.
Taking a class can further enhance you GPS knowledge. Classes are frequently offered through the local community college’s continuing education program or at local retailers such as REI.
A map and compass always goes with me into the field. I carry a Silva Ranger compass and get my maps from Caltopo.com (their maps are free.)
Have fun while building on your fundamental navigation skill sets. Consider setting up a treasure hunt or a geocach for a family get together. Make it fun, make it simple and explain that these skills could one day make a huge difference if the ever got lost in the woods.
Sunday, September 2, 2018
Snakes
The California Department of Fish and Wildlife (CDFW) is reminding the public to be rattlesnake safe. All of California is snake country. Much like bats, rattlesnakes are often misunderstood. They play an important role in the ecosystem by keeping rodent populations under control.
California has six venomous snakes, all of which are various species of rattlesnake. They are heavy-bodied, blunt-tailed with triangular-shaped heads. A rattle may not always be present, as they are often lost through breakage and not developed on the young. Additional species information can be found here.
Rattlesnakes are generally not aggressive and usually strike when threatened or provoked. Given room, they will retreat and want to be left alone. They are not confined to rural areas and have been found in urban environments, lakeside parks and golf courses.
The best protection against unwelcome rattlesnakes in the yard is to have a “rattlesnake-proof” fence. The fence should either be solid or with mesh no larger than one-quarter inch. It should be at least 3 feet high with the bottom buried a few inches in the ground.
Keep the fence clear of vegetation and debris. Encourage and protect kingsnakes, which prey on rattlesnakes, and other natural competitors like gopher snakes and racers.
On rare occasions, rattlesnakes can cause serious injury to humans. Most bites occur between the months of April and October when humans are most active outdoors. The California Poison Control Center notes that rattlesnakes account for more than 800 bites each year in the U.S. with one to two deaths.
CDFW recommends the following outdoor safety precautions:
- Wear hiking boots and loose-fitting long pants.
- Never go barefoot or wear sandals when walking through wild areas.
- When hiking, stick to well-used trails.
- Avoid tall grass, weeds and heavy underbrush where snakes may hide during the day.
- Do not step or put your hands where you cannot see, and avoid wandering around in the dark.
- Step ON logs and rocks, never over them, and be especially careful when climbing rocks or gathering firewood.
- Remember, rattlesnakes can swim so never grab “sticks” or “branches” while swimming in lakes and rivers.
- Teach children to respect snakes and to leave them alone.
What to do in the event of a snake bite:
- Stay calm and wash the bite area gently with soap and water.
- Remove watches, rings, etc, which may constrict swelling.
- Immobilize the affected area and go to the nearest medical facility.
- DON’T apply a tourniquet.
- DON’T pack the bite area in ice.
- DON’T cut the wound with a knife or razor.
- DON’T use your mouth to suck out the venom.
- DON’T let the victim drink alcohol.
A great article on snake bites was published in Outside Magazine.
Friday, August 31, 2018
Map Datum
 For most hikers, the map datum selection isn't critical. New and right out of the box, GPS receivers are set to Map Datum WGS84. And for most hikers that setting will be just fine. Out and back - no problem. But if you are going to take coordinates taken from a map or from a friend, AND accuracy is important, ensure you use the right map datum. Map Datum is defined as: "A mathematical model of the Earth used by map makers. Datum allows for the accurate transfer of geographic data from a spherical earth to a flat map. In the United States, there are three common map datum’s found on topographic maps. These are WGS 84, North American Datum 1927 (NAD27) and NAD83. Select the datum that is used on the map. "Not selecting the correct map datum could induce an error of over 100 meters/yards. I emphasize that hiking groups should all be on the “same page” regarding the set-up options of their GPS receivers. Map Datum information is found in the map key on most maps.
While planning a journey or at the trail head, taking the time to adjust settings among hiking partners is critical. Before departing, validating map datum and coordinate format should be a priority.
First, match the map’s datum. A topographic map identifies datum in the map key. Once the datum is identified ensure that all GPS receivers are set to match the correct datum. See the illustration below.
For more information on GPS setup setting check out: Improving GPS Accuracy, Setup Your GPS  |
Thursday, August 9, 2018
Foods Toxic to Dogs
My wife and I have been doing quite a bit of traveling this summer. In late May we visited our friends in Virginia. We had a very long day of flying and looked forward to a relaxing visit. While we were recuperating, the family’s dog was in the guest room scrounging through one of our suite cases. My wife went to the guest room, found the dog and importantly, found a bag of Dove Dark Chocolate that had been opened with all the contents gone. Out host called the local Vet Emergency room and was told to get the dog to the Vet ASAP.
On their arrival, the Vet administered a shot that quickly caused the dog to throw-up.
The following are foods that are poisonous to our pets. The Humane Society has a complete listing.
Alcohol
Avocado
Chocolate, Coffee and Caffeine
Citrus
Coconut and Coconut Oil
Grapes and Raisins
Macadamia Nuts
Milk and Dairy
Nuts
Onions, Garlic, Chives
Raw/Undercooked Meat, Eggs and Bones
Salt and Salty Snack Foods
Xylitol
Yeast Dough
If you believe that your pet has ingested toxic foods contact the ASPCA Animal Poison Control Center at (888) 426-4435.
Check the label information on the food product. The Dove Chocolate packaging had a phone number on the back for emergency support. I called that number and received excellent help.
Thursday, April 5, 2018
How to Store Your Camping Gear
The following post is by Guest Contributor Lee
You will need to store your camping gear between
outdoor activities. However, don't just throw all your items into a closet.
Instead, follow these camping gear tips to ensure you are ready for your next
adventure.
Put Your Items in a Secluded Place
Unless you go for an adventure every week, you
probably want your camping gear to stay in a safe and secluded space. Space
needed will depend on how much equipment you need to store, but some of the
places where you can store your camping gear include the garage, an unused
closet, or the attic. Consider finding a self-storage unit if you don't have
enough space in your house to keep your camping gear.
Keep Your Camping Gear in a Sealed Container
Don't just go with the cheapest option when you
are looking for camping storage containers. Instead, look for containers or
shelves that meet your needs and are durable. You could store outdoor gear on heavy duty wall shelves
or in portable lockers that can serve as a bench while camping. Make sure to
get tightly sealed containers if you live in an area with high humidity.
Moreover, tie-down loops and reinforced handles can help secure the storage
locker in your vehicle.
Label Every Package
Once you have sorted out the gear, place them in
labeled containers. It can be advantageous to use clear packages as they let
you see what is inside. However, labeling makes it easier to find an item. You can use a
permanent marker to write on the bag or packaging container. Alternatively, you
can apply self-sticking labels to each container or bag. Self-sticking tags can
be an attractive option especially if you want to make changes later or if you
are short-sighted.
Your labeling options can change a bit if you are
using fabric containers such as canvas bags. You can use a sewing machine to
personalize your gear. Alternatively, you can attach luggage tags to the
handles. You can use duct tape to make personalized luggage tags. You can also
write descriptions on slips of paper and attach them to your bags or containers
using a laminator. You can use whatever is at your disposal to be as creative
as possible.
Keep the Odor at Bay
Nothing is more irritating than pulling out your
camping gear before an adventure and discovering that it smells awful. Your
camping gear can be ruined by dirt, mildew, and/or bad odor. It is necessary to
clean your camping gear thoroughly before your next trip. Clean and dry your
camping gear, especially your bedding and tent before even storing it to avoid
a disgusting smell. You can also pack a dryer sheet along with your camping
gear to help with the smell.
Compartmentalize Smaller Items
To help keep track of everything, it would be
good to put small, related items together. You can keep cooking gadgets and
utensils in something like a toolbox. You can browse the internet to find boxes
of different sizes and shapes to ensure you find the container that fits
whatever you want to store. Plastic bags are an inexpensive and convenient
option for storing as well. You can even recycle items such as comforter bags
and coffee cans to reduce the costs. You will be able to find what works best
for you.
Hopefully these tips can help you figure out how
best to store your camping gear between trips this summer. You’re going to want
to be able to find everything each time you go, and maybe incorporating a few
of these can help you.
Sunday, April 1, 2018
Wilderness Guide
The National Outdoor Leadership School's "Wilderness Guide" is a wonderful book to add to your backcountry library.
"The classic backpackers handbook - revised and updated with information anon new equipment and techniques-providing expert guidelines for backpackers, hikers, campers- anyone who loves the outdoors."
Author Mark Harvey is a NOLS instructor and freelance writer.
This book is an excellent first step in the planning process for backcountry travel.
Available at Amazon.