Map, Compass & GPS

Map, Compass & GPS
Wild flowers along Fall Creek on the way to the Green Lakes - Oregon

Thursday, June 7, 2012

Is Your Compass or GPS Receiver Broken

What do you do when a compass breaks or the GPS just doesn’t seem to be working right?  Here are a few suggestions that will help the navigator.

The theme of this post is to discuss what options the backcountry navigator has with equipment that might not be working correctly. 

When equipment does not appear to provide the correct indication (such as the GPS bearing to the trail head) it’s time to stop.  Never rush navigation.  Stop and take the time to really look over the information provided.  Consult with the rest of the group.

Being able to recognize the proper operation of the hiker’s equipment is important.  This is obtained through field checks well before any trip.  The gas stove can be tested at home before the journey.  The navigation kit can be evaluated throughout the year at the local park or forest. I recommend to the elk and deer hunters in my GPS classes to take their receiver everywhere they go for two weeks prior to leaving for camp.  Push buttons, change displays, mark a waypoint and finally, return to a destination.  Like a pilot of a plane, a map, compass and GPS are the instruments in the backcountry cockpit.

Normally a magnetic compass’ needle rotates freely.  The needle rotates on a jeweled pivot point.  The magnetic compass should be kept level while in use allowing the magnetic needle to move about in the compasses housing.  My Suunto recently just stopped rotating.  I would change direction about 30 degrees and the magnetic needle would move about 15 degrees and then just hang up.

Sadly, there is no simple in the field fix for this.  I gently tapped the compass body and checked the movement of the housing but nothing seemed to work.  Never let broken gear clutter your pack or be used mistakenly.

A back up compass is very helpful in such a situation.  It doesn’t have to be expensive, just reliable.  No matter what you use for a back up, it has to work well and requires testing.  I take all my new compasses to a location in town where the streets run north and south (degrees true.)  I will hike the streets insuring that the compass is on the mark.  This only takes a few minutes.  Recently I noticed that one of my small ball compasses seemed to be at least 20 degrees off; it’s a goner.  Note, that a small back up compass may not be as precise as your primary model.  Also recognize that some compass will only provide a trend of direction such as moving in a northerly direction as opposed to tracking on a direction of 025°.

Before throwing a quality compass out, contact the manufacturer to see what the warrantee offers.

So what does the hiker do if the GPS receiver appears to be broken?  
The following are steps that I’ll perform:

1.    If I have a GPS with an electronic compass I’ll ensure the compass is activated.  For example on the Garmin 60 series, pressing and holding the “page” button with turn the compass on or off.


2.    I’ll ensure the electronic compass is calibrated.  The compass must be calibrated after each battery change.


3.    Check the charge on the batteries.  If in doubt replace them.


4.    When the “Go To, Find or Where Is” option has been selected, older models will require motion to cause the compass arrow and displays to adjust.  Take five or more steps and see if there are any changes with the display.


5.    Turn the GPS receiver off, open the battery case and remove one battery for about twenty seconds, return the battery and power up the receiver again. 


6.    Once powered up, I want to be certain that the receiver has captured the signals from at least four satellites.


7.    Worse case - call the manufacturer.  Call early in the morning.

In the field, I leave my receiver powered on, collecting data the entire trip.  I keep my receiver in a holster that attaches to one of my shoulder straps.  Before leaving the trail head I “dump the junk” and get rid of old waypoints (e.g., last year’s fishing trip hot spots), I reset data fields on the odometer page and I will clear out my track log.  As I hike, my receiver is collecting all my trail data.  Should my receiver’s compass display fail I can follow my track (the “bread crumb trail” on the map page) back to the trail head.

Lastly, I will consult my map. Using the major land features (e.g., ridge lines, peaks, etc.) I will orient the map, determine my location (using terrain association) and direction of travel.

Tuesday, June 5, 2012

The Walking Stick

Although the vast majority of walkers never even think of using a walking staff, I unhesitatingly include it among the foundations of the house that travels on my back. I still take my staff along almost as automatically as I take my pack. It is a third leg to me – and much more besides.” – Colin Fletcher, The Complete Walker III, 1984 (page 78)

by Leon Pantenburg

Most of us don’t think about including a walking stick in survival preparations. But for some, a sturdy walking stick should be a key component in any emergency gear.

Older people might need the stick to serve as a balancing tool. With training, the stick can be a formidable weapon. The stick can serve as one support for a tarp shelter. If you have to cross a stream, a wading staff can keep you from going into the water.

If you are wading out of your house in floodwaters, or picking your way through debris after a tornado, a sturdy stick can be very helpful.

Like most people I never gave any thought to using a walking stick, even though I read Fletcher’s books cover-to-cover several times. I backpacked and hiked more than a thousand miles without a stick, and never thought anything was missing.

To read the rest of Leon's post go here.

Monday, June 4, 2012

Emergency Shelters by Kummerfeldt

By Peter Kummerfeldt

There may come a time when you have to spend a night out that you hadn’t planned on. It may be because of weather, darkness, injury or more commonly, getting lost! Regardless of the cause you are now faced with nine or ten hours of discomfort at best and, at worst, the loss of your life because of your lack of preparedness for the event.

No one wants to spend a cold, wet, hungry, lonely night out away from family and friends - but it happens! And it happens all to frequently. It happens to both to the experienced and the novice – none are immune from the possibility of having to survive cold temperatures, high winds and precipitation sitting out under a tree somewhere waiting for the sun to come up the next morning. It is more likely that the experienced person will be better equipped and ready for a night out.

To read the rest of Peter's post go here.

Friday, June 1, 2012

Compass Navigation - Plotting Your Position

 A quality compass is an integral part of the backcountry navigator’s kit.  Sighting with a compass is an important skill that can determine direction to an object or help the hiker locate and identify his position in the backcountry.

This post discusses the steps to be taken to use a compass to plot one’s location on a topographic (topo) map in the back country.  In the vocabulary of navigation this is also known as “fixing” or determining “position.”

The first step is to ensure that the hiker has adequate maps both in quality and quanity.   I recommend carrying a set of maps that include 7.5’ United States Geological Survey (USGS) maps and a second map type such a United States Forest Service map.  The USGS map gives me the detailed information of the immediate area while the other map covers a much broader and larger area. 

Before heading for the trail, take a look at the maps at home.  Scouting from your desk allows you to find significant land features that will surround the direction of travel.  Features such as distinct mountain peaks, a stream, and a ridge line are just of few topographic “hand rails” that can be of value in the field.  By spending some time at home with the map the hiker develops a mental map, a mental picture of the trek in advance of the actual journey. 

Account for declination before leaving the trailhead.  I like to keep my navigation simple and personally use a compass that can be adjusted for declination such as the Brunton 8010G.  Declination information found at the bottom of a topographic map is frequently out of date.  Check the web site www.magnetic-declination.com  for the current declination.

 “A compass is basically a magnet mounted on a pivot, free to turn in response to the pull of the earth’s magnetic field.  The housing protects the needle and helps you relate the direction in which the needle points to directions on the map and on the land.  A compass by itself can’t tell you where you are or what you are looking at but it can tell you about direction….”

Staying Found, The Complete Map & Compass Handbook, by June Fleming

Sighting with a compass allows the hiker to do several things.

First, sighting on a distant object can provide direction to that object and repeated sightings can provide course corrections along the way.  Secondly, with several sightings on different objects a person’s position can be determined and plotted.

Compass direction to an object is known as the “bearing” or azimuth.   Bearing is the more common term in outdoor recreation and is a term used heavily in GPS navigation.  For example, if a mountain peak is due north of you, the bearing to the peak is 000° (read as zero zero zero degrees.)  A compass can also assist the hiker by orienting a map and following a line of bearing taken from a map.

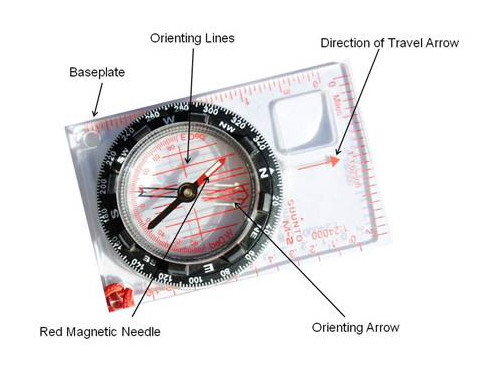
The picture below offers a quick review of the components of a baseplate compass.


To sight or take a bearing do the following:

  1. Using the owner’s manual, adjust the compass for declination.
  2. While holding the compass at waist level, turn squarely towards a distant object.  Hold the compass so that the direction of travel arrow points directly at the object. (Point the direction of travel arrow away from you, perpendicular to your body.)
  1. While holding the compass, turn the compass housing (the dial) and align the orienting arrow (a red arrow engraved in the rotating housing) underneath the red magnetic needle.


 To determine and plot or “fix” a position, the next step is to plot bearings on the map. In a “nut shell” this means that bearings to three clearly identifiable features are used.  Ideally, objects that have a bearing separation of 30° – 60°.  Good bearing separation provides better fixing information and plots on the map cleanly.  The bearings are then plotted on a map and where the three lines cross is the hiker’s location.  This complete process is called triangulation.

The following are suggestions for triangulating a position in the back country.

  1. Identify three (or more) distinct objects to sight on.  Note that the objects need to be on the topo of the area. 
  2. Orient the topo using the compass.  Orienting the topo means that the map’s left or right border is pointing to true north or 000° degrees true. 
  3. Sight on an object such as a mountain peak or church spire.  (Note that not many objects in the backcountry are so distinct and crisp.  Do the best with what you have.)  Ensure the direction of travel arrow is pointed towards the object.  Be as accurate as you can, point directly at the object.
  4. Turn the compass housing until the orienting arrow is directly under red magnetic needle.  Do not move or rotate the compass housing, keep the new bearing in place.
  5. At this point, and while plotting the bearing on the map, the compass will now be used like a protractor.  Importantly, the movement of the magnetic needle is not important.
  6. Lay the compass on the map with either the top left or right corner of the baseplate on the landmark.  This will be a pivot point while aligning the compass.

  1. With the edge of the baseplate in position, rotate the compass (swing) left or right until the N (north) of the compass housing aligns with map North (the top of the map.) 
  2. Draw a line (along the baseplate) from the object (e.g., the mountain peak) to your approximate area.  Draw a nice long line.
  3. Repeat the process two more times using other distant objects to sight on.
  4. Ideally the three lines will intersect in the immediate area; this is the hikers location.  But because of compass error and human error the point of intersection maybe spread out.  Still, triangulation will put you in the ballpark.  Use terrain association to help narrow down your position.


Tuesday, May 29, 2012

Steps to Improve Compass Accuracy

To improve accuracy I’d suggest:

  • Ensure the compass is “on the mark” in terms of correct declination adjustment, the setting of the Direction of Travel Arrow and the alignment of the compass to the bearing (are you really pointing in the right direction.)
  • Pick the best land marks to work with such as pinnacles and spires and pronounced land marks; the choices may be limited.

There are several factors that impact accuracy that the hiker may have no control over but should be aware of.  Some of these include:

  • The quality of the hiker’s vision.

  • Polarity of the compass’ magnetic needle – does it point in the right direction? Polarity may change over time such that the magnetic needle my no longer work accurately.
  • Smooth movement of the magnetic needle.
  • Alignment of the compass dial to the compass housing.
  • Local attraction – Similar to declination, local attraction is magnetic interference unique to a specific location.  It may be caused by buried metal objects or an unusually high concentration of iron or nickel in the ground.
Navigation is not hard but it does take practice; it is a perishable skill.  I recommend to those in my classes that a minimum of two weeks before a backcountry trip that the GPS, map and compass goes everywhere with them.  Practice in the field or at the park.  Take the time to compare the three with what is seen. 

When in the wilderness compare both map and compass with a GPS when possible.  Hiking companions should compare their work too.

Familiarity with your equipment will make you a more skilled advocate for your safe return.


Sunday, May 27, 2012

Mora Knives

Check this guy's site for information on the Mora knives available on the market today.  Lot of choices.

Mora Knives.

Lighten The Load

This is an older post from Section Hiker's site.  It's a great read.

The subject is how do you lighten your backpack?What should you leave behind on your next trip in the backcountry?

Tracking Unused Backpacking Gear

The next time you go on a two or three day backpacking trip, keep track of every item that you brought along and whether you used it. If you haven't done this before, chances are good that there are several items of clothing or accessories that you brought with you, and felt you needed, but you didn't actually use. Some common examples are:


To read the rest of the post go here.