Map, Compass & GPS

Map, Compass & GPS
Wild flowers along Fall Creek on the way to the Green Lakes - Oregon

Monday, June 30, 2014

A Sit Pad

A simple pad to rest on in the backcountry.

I am finding that most people are moving away from the old ensulite pads for the very reasons Leon outlines. Though inexpensive an ensulite pad doesn't provide a lot of warmth and comfort to the hiker.

Photo by Leon Pantenburg
Today I find myself buying the occasional pad for a new use, a sit pad.

A sit pad is a small piece of pad cut from the original that I will use while hiking, hunting and on SAR missions. Of course I am not getting the full benefit of the pad by cutting it down but I am not looking for something to lounge on either. The pad is used to provide my bottom something to sit on. The smaller pad will help keep me dry, keep rocks from poking uncomfortably in the wrong places and provide some insulation on a cold day.

The shape is a matter of personal choice. My pad is about a third to a half of the length of the original pad. I'll also cut down the sides too.

I can make two pads from one full length pad. I'll put one at the bottom of my SAR pack, day pack and hunting pack.

An old blue ensulite pad at the top of my hunting pack. Blake Miller
photo
I find used pads at my local thrift store, garage sales (for pennies) and military surplus stores.

Sunday, June 29, 2014

Backpacking Gear List

I was navigating/surfing through one of my favorite web sites this morning; www sectionhiker.com.  This is a very comprehensive site.  On the right side is a listing of topics by categories and my eye was drawn to "Gear Lists."  I like lists.  Here is one of 23 posts related to gear lists. 


There’s a fair amount of change in my clothing and gear mix this year over last, because I’ve worn through a lot of my old backpacking clothes. I’ll also be trying a very low cost aluminum pot from Olicamp that has a built in heat exchanger (like a Jetboil) to save fuel, in addition to a canister based stove that I’ve been using for the past year.
In terms of water purification, I’m leaning toward using chlorine dioxide again because it requires shorter break times at streams. While filtering water using my Sawyer filter is fairly efficient, it still takes longer than I like if I’m trying to hike a fast pace.


 To read the rest of the post go here.

Friday, June 27, 2014

A Basic Survival Shelter


After a search for three men on Oregon's section of the Pacific Crest Trail I thought it was time to review the basics of a survival shelter.

Peter Kummerfeldt narrates this 38 minute video and covers the basics.

Would enjoy your feedback on this one.

Thursday, June 26, 2014

Brunch On The Trail

I found the following recipe at Seattlebackpackersmagzine.com.  This is good.

By Anna Elliot
 
For me, mornings on trail are by far the hardest part of the day. Forget big mileage, blisters, or bugs— climbing out of a toasty warm sleeping bag? Not easy. Luckily, I have a backpacking breakfast recipe that will make you want to get out of bed and will restore some of that belly warmth from the inside out, too.

Behold… Icka Brunch
 
Where the name Icka Brunch comes from originally, I couldn’t tell you. The name and recipe come to me from a YMCA camp in the Northwoods of Wisconsin where I led canoeing trips. And let me tell you, no trail recipe is more reliably vetted than one by a group of picky thirteen-year-olds. This cheesy-hashbrown skillet dish is well tested and always makes that painful trek out of your sleeping bag totally worth it.

To read the rest of this post go here.

Using My SPOT Locator Beacon

While backpacking with my sons, hundreds of miles from home in a remote area of Glacier National Park, I was able to send information to my wife every evening.  Those messages from my SPOT (which stands for “SPOT”) locator gave my wife peace-of-mind.

Locator beacons have been available to outdoorsman for several years.  The basic idea is pretty straight forward: to help someone stay out of trouble in the backcountry by providing a method for them get help.

Spot units are communication devices that use satellite systems to link to control stations to forward messages.  SPOT, manufactured by Global Star Communications, has made locator beacons affordable and multifunctional.  Criticized initially for a lack of GPS sensitivity and other issues, SPOT responded with the SPOT II, an upgraded and improved, smaller and more reliable model.  An annual subscription fee is charged to use a SPOT unit.

SPOT units are a good choice for anyone who wants to stay connected to family, friends and emergency responders.  One of my friends gives his wife the SPOT when they go shopping in Portland, Or., at the malls!  Talk about urban survival skills!

My intent is not to get into a technical discussion but to share some lessons that I have learned after extensive use of my SPOT in a variety of locations and weather conditions.
Last year SPOT came out with a memo of “Top Tips…” for using the beacon. These tips can be found below at their “Frequently Asked Questions” post (www.findmespot.com).
Among those tips are:
  • Always use lithium batteries. They provide more power and work at lower temperatures than alkaline batteries.
  • SPOT recommends that you send and verify receipt of an OK message on its first use, after:
    • traveling long distances;
    • after changing the batteries; and,
    • if the unit has been sitting on the shelf longer than two weeks.
  • Check the SPOT web site for the complete details; search on “tips.”
After purchase, you’ll need to set up your SPOT at home on your computer.  That’s pretty straight forward.  You will be asked to enter either email addresses or cell phone numbers for text messaging.  You can enter a maximum of 10 or a collection of several combined text and email messages.  Messages are preloaded at home.  You cannot load a message for transmission in the field.

Now that I’ve had and used my SPOT for almost two years, there are a few lessons friends and I have learned:
  • As you type your message, enter your name, cell phone number and a general description of your location.  For example: “I am fine, camping up in the National Forest, 541 280 1234.”
  • You may end up on several of your friends’ call lists.  It would be good to know, if you receive a SPOT message, who it is from so that you can respond appropriately.
  • Confirm with your friends that it’s OK to have them on your help list.  Update that list for each trip.  Don’t take for granted that you have their blanket permission to be there forever.
  • Now this can be a bit dicey.  If an acquaintance calls you and asks if he can put you on his list, think that over carefully.  Do you really want to be on his list? If so, set a time limit or establish some parameters.
  • I recommend you also send one OK/Checking-in message before departing on a trip.
  • Try to give your SPOT a clear sky view when preparing to send a message.  Some tree cover is OK but a heavy canopy can present a problem.
  • After sending one message, I always repeat the message to ensure transmission.
  • The power on-and-off button is a bit difficult to press down. That’s OK  – you don’t want it to activate unintentionally in your pack.
  • Remember, if you are injured away from your pack, and incapacitated, you can’t activate your SPOT.
  • If you tell your friends and family on the call list that you will send a message at certain times during the day, stick to that schedule. You don’t want them to request Search and Rescue assistance if you don’t need it.
The SPOT beacons offer a unique method of communications in the back country but it is by no means the end-all to wilderness safety. Any electronic device that uses batteries is vulnerable to failure, damage or shorting out. No SPOT or GPS is a substitute for a map and compass and the ability to use them. No electronic device, no matter how advanced, can ever excuse you from taking along a complete survival kit.

The SPOT offers a unique method of communication and can provide peace-of-mind to the people in the backcountry and to those at home. Use your SPOT responsibly.

Tuesday, June 24, 2014

Understanding Magnetic Declination

 “Declination:    A Noun. The horizontal angle between the true geographic North Pole and the magnetic North Pole, as figured from a specific point on the Earth.”
 
Declination is a term that causes “brain cramps” for many of my students in my map and compass classes.  When I mention Magnetic Declination eyes roll.  That said, declination is a physical limitation that the hiker must understand.
 
The web site www.magnetic-declination.com  has an excellent discussion of what declination is and what causes it:

“Magnetic declination varies both from place to place, and with the passage of time. As a traveler cruises the east coast of the United States, for example, the declination varies from 20 degrees west (in Maine) to zero (in Florida), to 10 degrees east (in Texas), meaning a compass adjusted at the beginning of the journey would have a true north error of over 30 degrees if not adjusted for the changing declination. The magnetic declination in a given area will change slowly over time, possibly as much as 2-25 degrees every hundred years or so, depending upon how far from the magnetic poles it is. Complex fluid motion in the outer core of the Earth (the molten metallic region that lies from 2800 to 5000 km below the Earth's surface) causes the magnetic field to change slowly with time. This change is known as secular variation. Because of secular variation, declination values shown on old topographic, marine and aeronautical charts need to be updated if they are to be used without large errors. Unfortunately, the annual change corrections given on most of these maps cannot be applied reliably if the maps are more than a few years old since the secular variation also changes with time in an unpredictable manner.”

To read the rest of the post go here.

Friday, June 20, 2014

GPS Setup - Coordinates

Coordinates refer to the grid system the hiker uses to identify position location in the backcountry.  Latitude and Longitude is an example of a coorinate system that can be used.  The GPS receivers offer a lot of flexibility and use many of the key formats found worldwide.

I have received a few emails about what coordinate system to use with a GPS?
Coordinate system refers to the geographic grid used on a map; Latitude and Longitude is a coordinate system.  The GPS receiver may call it position format.
My recommendation would be to consider:
1.    When traveling outside of the United States find out what system the visited country uses.  The GPS receiver has coordinate systems pre-loaded for many countries around the world.

a.    On a Garmin select “Setup” then select “Units” (below).


b.    Select the drop down menu under “Position Format” and rocker down to view the country options.
c.    If on a tour or with a guide ask which coordinate system they use.

To read the rest of this post go here.

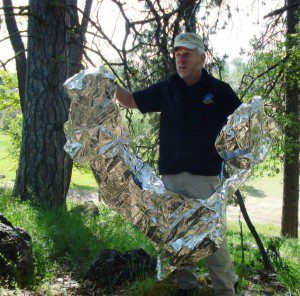
Survival Blanket


The following post is by my friend Leon.  Survial blankets have a use but they are definately not an emergency shelter.
by Leon Pantenburg
I stopped at the wilderness survival seminar at the Deschutes County (OR) Expo Center more out of curiosity than anything else. The presenter was Peter Kummerfeldt, and he has the  wilderness survival credentials. A retired Air Force survival instructor, with 30 years service, Peter had taught wilderness survival all over the world in such diverse places as the military’s arctic survival school in Fairbanks, Alaska, and the jungle school in the Philippines.
Survival expert Skip Stoffel demonstrates how fragile a mylar blanket is in a survival situation. (Blake Miller photo)
Survival expert Skip Stoffel demonstrates how fragile a mylar blanket is in a survival situation at the 2013 Washington state Search and Rescue conference. (Blake Miller photo)
A survival mindset requires always being open to learning new things, and I figured I could pick up something. It took Peter about 20 minutes to point out my ignorance.

To read the rest of the post go here.

Thursday, June 12, 2014

Backcountry Weather Forcasting


The web site www.climbing.com has a super article about backcountry weather written by Laura Snider.  This post is right on the mark.


Meteorologist Joel Gratz is the source of reference for this post.  Key to the in the field forecasting is Gratz’s comment:
 

“…mitigating your chance of getting struck by lightning. If the temps drop a little bit, if the wind picks up, if it starts to precipitate, usually you have some time to extricate yourself from the situation.  But once the storm is close enough to produce lightning, you’re one bolt away from being injured or killed, and that can happen in a second.”

Those are words to remember.

Snider further breaks her post into subsections that makes so much sense:
  1. Before you go.
  2. In the field
  3. Back at home
Here are some of her recommendations.

Before you go:

  • Visit the http://www.weather.gov to get point forecast.  Knowing the weather in the urban jungle won’t help much but this site provides point forecasts specific to the area.
  • Monitor the weather radar.
  • Visit with the locals before you head to the backcountry.
In the field:

  • Watch the western sky.  Weather systems move across the country going from west to east; the eastern sky is the history of what has been.
  • Know your cloud types.  Watch out for those cumulus clouds as they move in.  Cumulus clouds are large, white and quite puffy.  As they gain elevation watch their shape color.  A cloud that darkens and just look mean is a good indicator to look for shelter.

Personally, I also monitor my GPS receiver’s barometer.  I change my elevation plot to a pressure plot and leave the receiver on.  Even though a GPS receiver may not be the most accurate it is the plots trend over time that I am concerned about.  Should I see the pressure drop noticeably I’ll take shelter or return to my vehicle.

In some locations I may be able to monitor the NOAA weather channels on my portable radio.
The Internet weather sites are great but aren’t of much help in the backcountry where there is no cell reception.

Tuesday, June 10, 2014

A Hiker's Trip Plan

Hikers are heading to the trailhead in large numbers now.

Remember to fill out a trip plan to let your friends and family know when you will return.

Go here for the hiker's trip plan.

Taking Good Care of Your Compass

A few thoughts on taking care of your compass and what to look for before you go hiking in the backcountry.


Remember that the correct operation of the compass is dependent on the action of the magnetic needle to guide the hunter through the backcountry.  Lots of items in a pack and clothing can affect the needle.  Most understand that ferrous objects such as a rifle barrel, belt buckle, and car keys will deflect the magnetic needle.  Still, take a good look at what is in a day pack.  The batteries from the GPS receiver and a flash light may cause a compass needle to move.

High tension power lines and a vehicle’s electrical system may also cause a magnetic needle to deflect.  Moving a few steps from the vehicle should be sufficient.  One may have to move over one hundred feet from the power lines to avoid deflection.  (GPS Made Easy, Michael Ferguson.)

Some locations will have a high concentration of iron near the surface.  This is known as “local attraction.”  Such concentrations will cause the needle to move too.  Unlike declination, moving away from the immediate area may cause the deflection to stop.  The local Bureau of Land Management or Forest Service Office should be able to identify areas affected by local attraction.

Recently, a retired forester commented that he had left his GPS and compass left on the dashboard of his truck.  The lanyard that came with the compass was wrapped tightly around both the GPS receiver and compass.  He estimated that the two sat on the dashboard for a little over three months.  He later noticed that the compass was roughly 30° off.  It’s an interesting anecdote that does bring up the point of how a compass must be properly stored.

 I recommend that a compass be stored away from electronics (e.g., GPS, radios), batteries and many metallic (knives, saw) objects found in a pack.  I don’t recommend going overboard on this but a compass could simply go in an exterior compartment, a shirt or coat pocket.  Attaching a brake away lanyard to a compass so that is worn around the next is a viable option. This would apply during the off season too; a little separation is a good thing.

It is possible for the magnetic needle to lose its polarity.  This is a function of time and manufacture.  With research, one can learn how to restore the magnetism.  That said, with the modern liquid filled compass this is probably more trouble than it is worth.  Occasionally, check the alignment of the compass.  In the small town where I live, residential streets are aligned true north and south.  Standing on the curb on such a street provides a quick verification of how the compass is working.  To me verification means that the compass direction will mirror that of the street; if the street tracks true north then the adjusted compass should provide a bearing to true north.

At the end of the hiking or hunting season take a look at the compass.  Flush away dirt or sand that may be on the baseplate or sighting mirror.  Look for bubbles that may appear internally and adjacent to the compass needle.  A small bubble may not be something to worry about but a large bubble may impact how the needle swings and moves.  A compass with a large bubble should be permanently removed from the hiker’s kit.

Lastly, keep in mind that a quality compass will retail for $20 or more.  Also, a quality compass can be mechanically adjusted for declination.  Such a compass is a precision piece of equipment.  This is especially true of the Silva Ranger style or the Brunton Eclipse models.  Note that I am prejudice (won’t buy them) towards the cheap stuff found on the racks of the major box sporting goods stores.  If a hunter is willing to spend hundreds of dollars on a rifle scope why not spend a bit more for a decent compass; it can make a huge difference. 


Monday, June 9, 2014

Cast Iron Cooking - Restoring a Treasure

Leon is a master Dutch Oven chef.

by Leon Pantenburg

Dan’s urban “survival training” came from Boy Scout Troop 18 in Bend, Oregon. He, along with most of his buddies, earned the cooking merit badge. The requirements included learning how to cook outdoors over a campfire, using aluminum foil or a cast iron Dutch oven.

Dan’s oven is a cast-iron, 10-inch Lodge-brand oven that can be used both indoors and outside. It is the same brand, make, model and size of oven I have used at least weekly for nearly 30 years. When I bought my new oven, it seemed expensive.


But Dan’s oven was free because it was slightly rusty and dirty from being stored in an old garage for years. A little elbow grease restored the cast iron to like-new condition.

To read the rest of the post go here

I really like my cast iron.  I do have a few garage sale pieces.  Some looked pretty rusty so I just had them sandblasted.  One guy charged me $20, another just wanted a 6 pack of Coors light.  Blake

Saturday, June 7, 2014

It Has To Work For You

New gear, technology, ideas, concepts, something you saw on a cable channel might sound great, but in the backcountry "It has to work for you."  It's got to work rain or shine.

During the course of teaching GPS classes for over 12 years and now wilderness survival I have become attached (so to speak) to a phrase, "It has to work for you."

There is nothing magic here. Nothing novel. Nothing original.

People enjoy talking about new technology, equipment or skills that they have learned. They are justifiably proud of their new knowledge.

A good friend got me very interested in using an alcohol stove while backpacking. It is economical, takes up little space and weighs but a few ounces. The problem is, that I can't get mine going reliably. I need more time with it to learn the basics; how simple can that be. But still, it is not working for me.

In SAR training two years ago, one team member told me how a computer mouse pad is great as a stove platform, in the snow while winter camping. So I try it out. I accidentally spill come Coleman white gas fuel on the pad. When I light the stove, of course the pad catches on fire; just great. The spot fire on the pad quickly burned out and just singed the top surface of the pad other wise it was just fine. This works for me.

There are a lot of books out there on backcountry travel and survival. Survival has become very popular. I suggest reading these with a critcal eye. If there is a particular technique or skill set that you want to adopt, test it at home first. Though the author may be on the speaking/sportsman show circuit, has his own cable show or is repeatedly on network news be critical. Remember, when you are in a jam, you are repsonsible for you.

Become cautious when reading old and dated material. For example, in the late 1960's I was given a copy of Colin Fletcher's book, "The Complete Walker." This book got me hooked on backpacking. That said, the book is based on lessons and experiences from almost fifty years ago. Doing some research and review of current methodology may be best.


Interestingly, I am hearing from my students more often, "I heard this was used by the Special Forces," or "I read in a magazine that this is what Special Forces do." Well, OK, but is that really true or better yet, is that important for your needs. It gets down to research and experience.

Let's consider land navigation. It is a practiced yet perishable skill. You need to be on your game. If you are the team navigator, you skill and techniques have to work for everyone.

So my point would be, as you prepare for a trip or hike, as you put new gear into your pack, test it in advance. Make sure it works for you.

Thursday, June 5, 2014

Making a Poly-Tarp Shelter.


by Leon Pantenburg

Today, even though I have several backpacking tents, I still frequently use a tarp. In some cases, such as making certain snow shelters, or when you need to go light, a tarp may be the best shelter choice.I hiked the 225-mile John Muir trail and completed a two-week southern loop of Yellowstone using the same piece of plastic visqueen as my only shelter. At the time, I was in my early-20s, just out of college, broke and trying to backpack long distances. My gear choices were directly related to my financial resources!
Tarp shelters are only limited by your imagination. Regardless of how you’re rigging yours, here are a few proven tips I’ve learned that can help make your shelter more secure.
To read the rest of Leon's post go here.

Wednesday, June 4, 2014

Russia Limits Some GPS Data Flow

From GPS World Magazine.

 As announced by Russian Deputy Prime Minister Dmitry Rogozin on May 13, 2014, GPS tracking stations co-sponsored by U.S. interests have stopped making their data available to scientists and others.

To read the complete post go here

No impact on U.S. recreational users.

Tuesday, June 3, 2014

Water Filtration In The Backcountry

Sectionhiker.com has a very interesting post on water filtration while backpacking.


The first time I tried filtering water from a stream, I knew that the distance I could hike in one day would never again be constrained by the amount of water I could carry. I remember the scene vividly: getting water out of a stream, surrounded by a sea of hobblebush, on West Hunter Mountain in the Catskills. Hiking was never the same for me afterwards. I’d been freed from the limits of my hydration reservoir.
I carried that pump purifier, a First Need weighing 17 ounces, for the next few years along the Long Trail, up the 100 Mile Wilderness, through the Catskills and the White Mountains, and down the Appalachian Trail, until I tried an inline filter and realized I could cut almost a pound of gear weight from my pack. That was the end of the pump, although I still keep it around for just in case we have awater main break (again).
To read the rest of the post go here.